
Wednesday, April 17, 2013

Sunday, April 14, 2013
Herbivore Fruit Drink
Herbivore
Fruit Drink
What is an herbivore? Are you one? Well you can eat like one when you make this yummy drink!
Ingredients:
3 cups cold fat-free milk
1 package (4-serving size) JELL-O Vanilla
Flavor
Fat
Free Sugar Free Instant Pudding
1 cup plain low-fat yogurt
1 cup crushed ice
1 medium banana, cut into chunks
Directions:
1. PLACE
all ingredients in blender; cover. Blend on high speed 1 min.
or until smooth.
2. SERVE
immediately. Or cover and refrigerate until ready to serve.
Stir just before serving. (Mixture thickens as it stands. Thin with additional
milk, if desired.)
SUBSTITUTE:
Substitute 1/2 cup sliced strawberries for the
banana chunks.
For more great recipes like this visit: http://www.kraftrecipes.com/recipes
Snake Pizza
Snake
Pizza
Ingredients:
3 packages of frozen bread dough. (Thawed)
1 can pizza sauce
2 cups shredded cheese (Cheddar or Mozzarella or a
combination of both)
Egg yolks depending on how many colors you wish
to use.
Food coloring
Other toppings: Pepperoni, Canadian ham, sausage
(precooked) or all three.
Directions:
1. Roll
out the dough into a 23 by 6 inch rectangle.
2. Spread
pizza sauce onto the dough
3. Sprinkle
on the cheese and any extras (pepperoni, etc)
4. Wrap
up the in a tube like shape
5. Moisten
the free edge with water and pinch to seal it.
6. Shape
the head at one end and the
tail at the other end of the tube.
7. Shape
the tube in an S-shape and place it onto a lined baking sheet.
8. Mix
the egg yolk with food coloring, colors of your choice, remembering to do only
one egg yolk per color of food coloring.
9. Paint
your snake with the egg yolk mixture.
10. Let painted sections rise for 20 minutes.
11. Bake
your Snake at 375 degrees (F) for
about 20-25 minutes or until the bottoms are golden brown.
12. Take
out of oven when done and let cool. Once
it’s cooled, cut your snake into sections and eat.


You can add olives with toothpicks for eyes
and red pepper slice for tongue!
Bison Dung Cookies
Bison Dung Cookies
Prep Time: 15 minutes Cook Time: 5 minutes
Total Time: 20 minutes Makes: 24 cookies
Ingredients:
2 cups sugar 1/2 cup milk
1/2 cup cocoa 1
pinch salt
1/2 cup butter 1
cup peanut butter
1 teaspoon vanilla 3
cups quick-cooking oatmeal
Directions:
1. In large saucepan, combine
sugar, milk, cocoa, salt, and butter. Mix well.
2. Bring to a boil and cover
saucepan for 30 seconds to allow steam to wash sugar crystals down sides of
pan.
3. Stir mixture and bring it to
a boil that can't be stirred down for 1 minute.
4. Then remove from heat and stir in peanut butter and
vanilla until smooth.
5. Add oatmeal and mix well. Do
not use regular or instant oatmeal; quick-cooking oatmeal is essential to the
success of this recipe.
6. Let the mixture stand for 10
minutes, stirring occasionally to let the oatmeal absorb some of the liquid.
7. Drop mixture by spoonfuls
onto waxed paper or parchment lined baking sheets.
8. Let cool completely before
eating. Store tightly covered at room temperature.


Pioneers as well as Native Americans used bison
dung as a fuel source for their fires. Along the trails of the pioneers
children would be sent to collect the "buffalo chips" and would even
use a chip as a Frisbee!!!
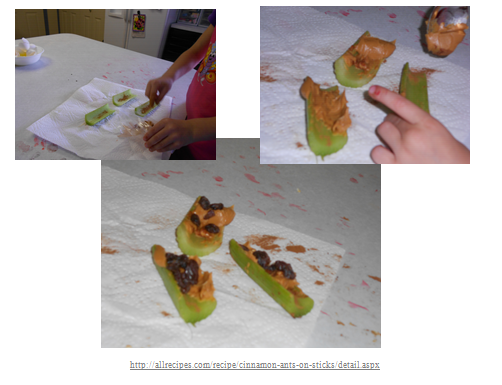
Brine Fly Snack
Brine Flies on a Log
Ingredients:
1
large stalk celery, cut into 3 pieces
3
Tablespoons peanut butter
1
teaspoon ground cinnamon
2
Tablespoons raisins
Directions:
Place the celery pieces on a clean
surface, hollow (U-shaped area) part facing up, and sprinkle evenly with cinnamon.
Spoon peanut butter into the hollow, and arrange raisins on top. (If allergic
to cinnamon, it can be left out or can be replaced with sugar. If allergic to
peanuts, cheese spread or pineapple spread can be used.) To add wings to your brine flies (raisins) use a small dab of peanut butter and some sliced almonds! Yum!
Tuesday, April 9, 2013
Salt Density Experiment
Why is it easier to float in Great
Salt Lake then it is to float in the Ocean? Does it have anything to do with the density or the salt content?
What You Will Need:
1 cup of tap Water
1 cup of “ocean water” to make use 1 1/2 teaspoon of salt & 1 cup of hot water can be mix it up until salt dissolves.
1 cup of salt water from your Great Salt Lake visit or mix your own with 4 1/2 Tablespoons of salt & 1 cup of hot water
3 cups labeled: Fresh Water, Ocean Water, Great Salt Lake Water
3 fresh eggs
*Use clear cups when doing this experiment to be able to see
what the eggs do!
Instructions:
Make your water samples and be sure
to label them
Observe what happens when you place
an egg in each cup
1. Place an egg
in the fresh water cup; watch it as it moves towards the bottom. Does it
sink fast or slow? Write down what you see.
2. Gently place
the egg into the Ocean water cup. Watch the egg carefully did it sink faster or
slower than the last? Did it sink as deep as the egg in fresh water? Write down
what you see.
3. Last place
an egg in the cup of Great Salt Lake water. Watch your egg carefully does it
sink or does it float? Why is this egg different than the rest? Why do you
think it is doing what it is doing?
Conclusion:
The different amounts of salt contained in each
water sample affect the density of the water. The more salt there is in the
water, the easier it is for the egg to float because the salt helps
"push" the egg up. That's why the egg in the Great Salt Lake water
floated much higher in the water than the eggs in the other two samples. The
same thing happens to you when you go swimming in Great Salt Lake! The water is
so dense with salt that it resists letting you sink. That is something you can
tell your friends the next time you go swimming in Great Salt Lake!
Subscribe to:
Posts (Atom)